What Prosthesis have I got.
Different prosthesis for various stages during my rehabilitation.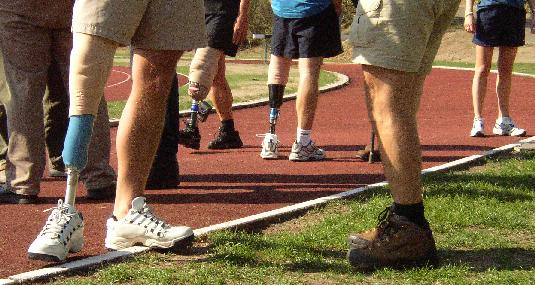
(photo: Gerard Schoutsen)

Because of all the problems with my stump after the amputation, I wasn't able
to wear a conventional lower-limb prosthesis. My rehabilitation physician
prescribed a temporarily prosthesis.
Not wearing any prosthesis at all during
the long period needed for healing, wouldn't be good for my muscles and motorial
abilities.
This interim prosthesis was basically an upper limb model, without
a movable knee. The points of support were just under the knee (condille) and
also clamp pressure with ski-locks on the upper leg. My vulnarable stump had no
further pressure points, which was the initional starting
point.
Unfortunately I do not have a picture of this "chimney pipe", but it
was heavy and clumsy whith its stiff knee. Sitting in a chair or in the car was
a problem. But I handled it well, walked good with it and could even balance,
standing on this stiff leg only.
For more than half a year I walked with my
chimney pipe, it really was a good plan of my rehabilitation docter after all.
A point of attention was the different way of walking. Because of the stiff
knee, all lateral movement needed for swinging the leg has to come from the
pelvis, or from swinging sideways. When getting used to this movement, it's hard
to learn a normal gait when later the use of a movable knee prosthesis is
possible again.
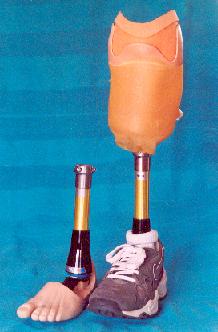 After all infections were healed, I was ready for wearing a real
lower limb prosthesis.
At last I would be able to bent my knee, walk properly
and maybe do some sporting later on.
First I wore regular cotton stump socks
but later a Otto Bock Derma Seal Gel Liner. When walking this caused a massage
of the sticked skinparts, although this hurted me during walking.
All
together I used this prosthesis for more than half a year to my satisfaction.
After some time however the changing of the stump volume caused socket fitting
problems.
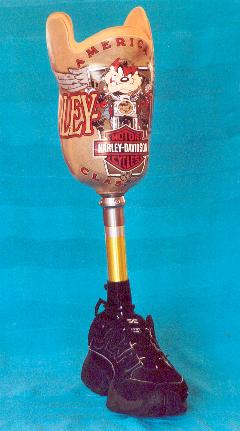 After fitting poblems with the second prosthesis a new
one was made for me.
This model had a lower socket profile, a suction liner
and knee suction sleeve with vacuumvalve in the pillar to attach the prosthesis
at the stump.
During forming of the plastic socket a Harley-Davidson T-shirt
was molded in, to improve the walking caracteristics.
A simple model foot was
attached, without energy response, dampening or suspension. Mainly made for
geriatric activity use.
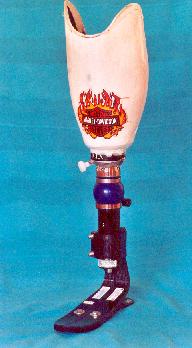 Whith my stump healed and sticking skinparts loose, time was right
for serious work. The Dutch supplier of Össur-producs liked to demonstrate
the Icex socket system and asked me to cooperate.
The Icex socket has a
full-contact fitting on the stump surface, without real support spots. There's
no inner socket.
The proces of making the socket is exceptional. By means of
a vacuum pump a carbon-fibre sleeve is formed tightly around the stump. After
about 5-10 minutes the sleeve is hardened into a socket. Total forming, fitting,
finishing and attaching to the prosthesis system can take no more then about two
hours.
Then the prosthesis is ready for walking!
Fast Foot: Ceterus FlexFoot.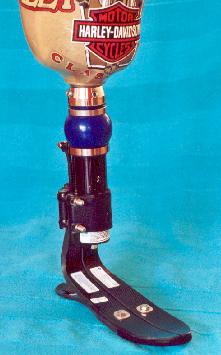 As soon as the road for a more active
prosthesis was free, the most important choise was the kind of foot to
use.
Searching the internet brought me to the FlexFoot models of
Össur.
Among others (College Parks, Freedom Inn. Otto Bock etc.), this
supplier of prosthetic products has a broad line of feet. My choise would be a
versatile model for high comfort.
Well, the choise was quickly made: the VSP
FlexFoot.
But when my prosthetist Martin Mulder of OIM "De Kastanjehof" asked
information to order one, a brandnew model was just released by Össur: the
Ceterus FlexFoot. New on the market!
Specifications were fantastic and
the order was quickly made. But because of the very high price the health
insurance company had objections, as expected. Motivation of Martin, together
with my doctor's Klaas Vlaanderen took care of a positive descision: the
application was granted, the foot was mine!
A fitting session was planned for
the whole prosthesis in one time:, Icex socket with Ceterus and
sportliner.
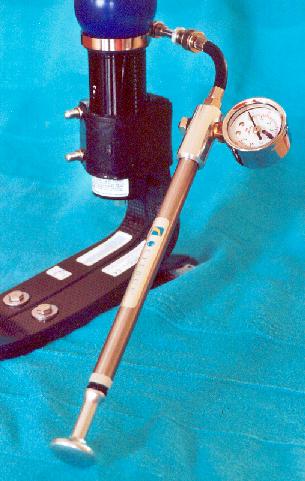
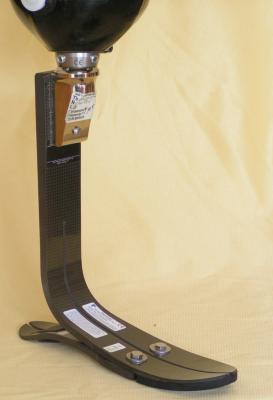
The Ceterus
consists of two J-shaped carbon-fibre springs. A long one for the "toes" end a
short one as "heel". The relation between the flextion of both springs is
adjustable by placing different wedges betwwen them.
The Ceterus foot has a
built-in adjustable airchamber providing shock absorbtion caused by effects of
jumping or jogging.
Adjustments to dampening for normal use or very
active use can be made by pumping up the pressure in the airchamber with an
external manual pump (included whith delivery).
There is a rotation
absorption as well, the distinct blue ball.
Rotating the body will cause the
rotator to twist, and prevent rotation of the stump in the socket.
The total
idea behind the concept is to compose a system that prevents frictioning or
shoving of the stump in the socket as much as possible.
Combination prosthesis.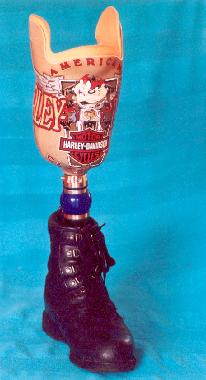 Walking on the Icex socket caused
problems after a few months. I got calouses at the tibia point of the stump
because of too much pressure, and this caused wounds. So the previous
Harley-Davidson socket was attached to the Ceterus FlexFoot.
I walked on
this composed system for almost half a year, until at that time the wounds
wouldn't heal anymore and the risk of infections was getting to big.
I was
also bothered by the rather high total weight of te prosthesis. The Ceterus is
outstanding in performances, but not perticular lightweight. This caused cramps
in my calf after short walks already: my claudication problems. As long as I
suffer from claudication, a lightweight prosthesis is the best for
me.
After 5 months of waiting: the "Seal-In Liner".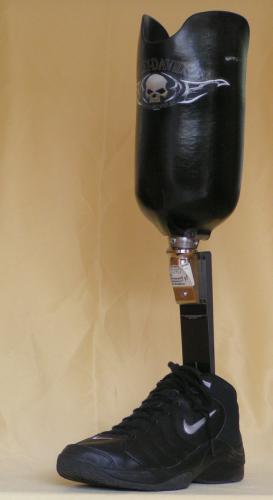 After the stump-reconstruction end of 2003 it took me 5 months to recover from the wounds and complications after the surgery.
Only then it was possible again to wear a prosthesis.
The choise for a new prosthesis was the new
Össur Iceross liner which could create a vacuum because of its build-in membrane.
This makes the additional use of a knee-sleeve unnescessary.
The whole system is lighter and gives more freedom in movement and fexability with bending the knee.
The idea was to make a light as possible concept which was flexible to wear.
My prosthesist Martin Mulder took care of this system and provided it with a beautyful H-D design socket.
Prosthesis
construction:
Excessive space in the Seal In liner.
Due to walking and exercising the muscle volume in the stump can increase gradually.
The prosthesis socket however is modelled on the moment I hadn't done mich for more than half a year with the muscles of my amputated leg.
This resulted in spots which got tighter (back of my knee), but also spots with more space as in the lower part of the stump because bodyfluids where transported better through musclemovement.
Adjusting the socket in the too tight spots created more space at the back of the knee.
The excessive space in the stumpvolume and in the distal areas can be filled up with stump sockets.
Important in this Seal-In liner system is, that the suctionhold of the liner onto the socked has to remain.
So the sealing membrane must keep contact with the socket at any moment.
I solved this problem by cutting off a cotton stumpsock and donning it over the higher end of the silicon liner.
I folded the rubber membrane ring over the cotton sleeve.
The distal space I filled up with a small piece of cotton stumpsock.
You can make this solution yourself by simply cutting stumpsock in two pieces, nearly at the end.
Now Össur makes the upper sleevesock in various knits. I wear one since and ik works well because the rims are stiched and do not curl up.
They do not provide the distal cotton cup, but it's possible to use a thin polymer disk at the bottom of the socket. I tried this and it works well for me
For those, who wear a silicon Seal-In suction liner and strugle with too much play in their socket, I made some pictures to make the solution more clear:
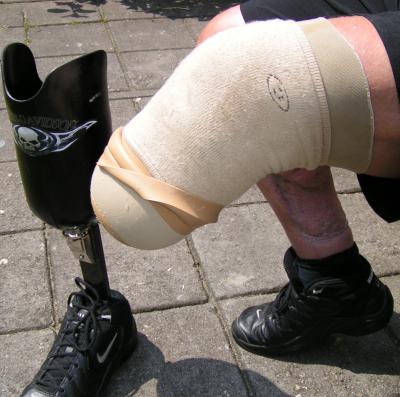 Too much space in the upper, non-suction section above the sealing membrane of the "Seal-In" siliconenliner is filled with the special cotton sleeve made by Össur: knitsize #3. The rubber ring is folded over the cotton sleeve so it doesn't interfere with the suction lock of the rubber membrane and the inner surface of the socket. |
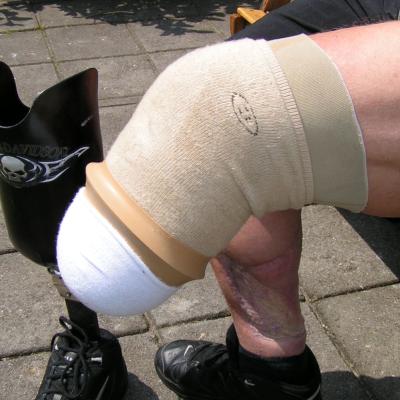
In the suction part under the sealing membrane, space is filled up by a small, cut-off cotton stumpsock. This small sock doen't cover the rubber rich which has to remain uncovered. Another solution is, to use a thin polymer disk, inserted at the bottom of the socket. |
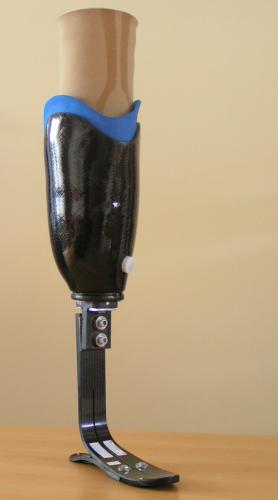 Pure frustration of every-time-damaged-stump withhold me to wear my prosthesis for months.
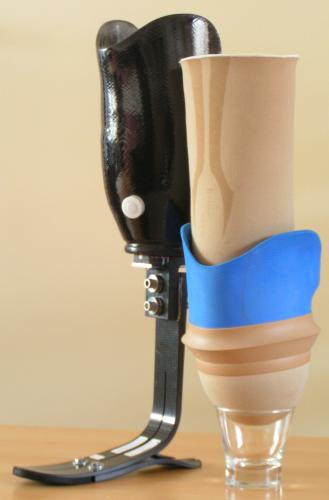
Prosthesis
construction:
Prosthesis construction:
Rather
naked than faked.
I don't find this
nescessary. It costs more, gets sloppy and you can always see from color and form
that it's artificial. A bit as a toupet, a camouflaged accessory which is not
what it seems to present.
Why would't I be proud of beeing able to do what I do
with an artificial leg? So people can get used to that phenomenon and to what a
prosthesis looks like.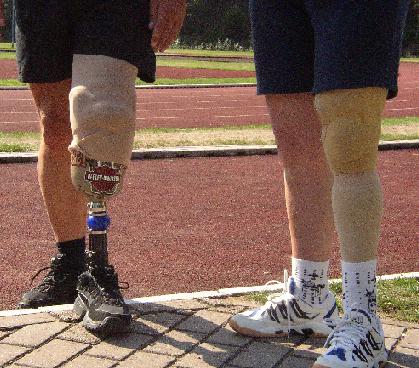 Every occassion I would have walked in shorts, a
bermuda or swimming pants before my amputation; I also wear this afterwards as
well.
When weather is nice, when sporting or jogging, when on vacation or
camping, or in the swimmingpool.
People around me react on this, however
mostly positively.
Disadvantage is that sometimes the conversations with
strangers start about my obvious disability and mostly continue only about
my disability.
The interest of children, how
affectionate as it mostly can be, is sometimes also a nuisance.
But, people
get used to the prosthesis soon, after having seen it several times.
When
everyone, who wears an artificial leg (arm or hand) would do this uncovered and
in public (if the occasion justifies ofcourse), wouldn't outsiders get used to
it easier?
From what I heard, in the USA amputees walk most of the time
with uncovered prosthesis.
Even when they'r wearing shorts, and only few
bypassers are surprised by the looks of an amputee with two different
naked legs.